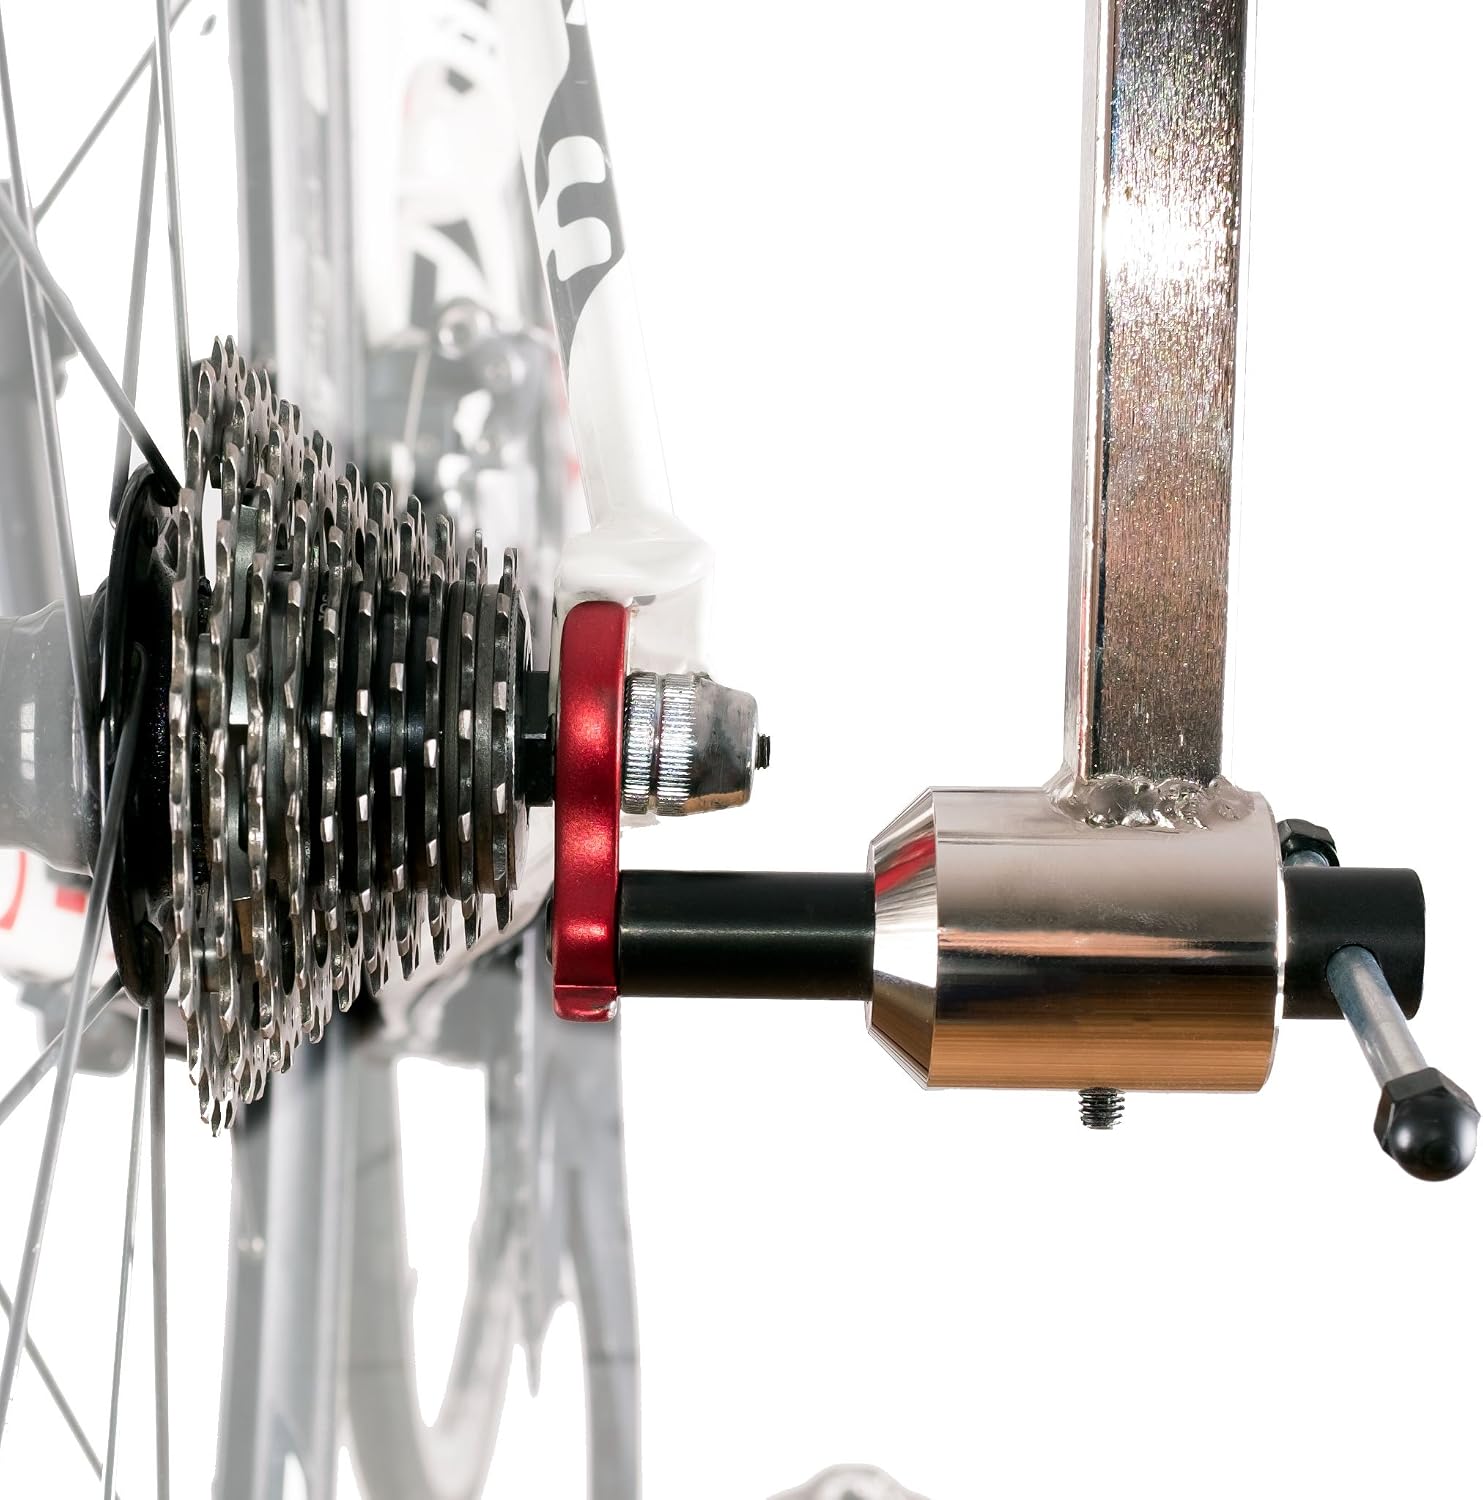
Your rear derailleur — the mechanism that moves the chain between gears on the back wheel — hangs off a small sacrificial tab of metal called a derailleur hanger. It’s intentionally the weakest link in the system: if you drop the bike or clip a curb, the hanger bends or snaps rather than cracking your frame. That’s the good news. The bad news is that a hanger can bend just slightly — not enough to see with the naked eye, not enough to feel in the pedals — and silently destroy your shifting quality for weeks. Ghost-shifting, chain skipping under power, an indexed derailleur that won’t dial in no matter how many cable tension tweaks you try: all of these symptoms show up regularly in shop conversations, and a surprising number of them trace back to a hanger that’s only two or three millimeters out of true. This guide explains how a hanger alignment gauge (the tool that checks and corrects that bend) fits into the home mechanic’s toolkit, which products are worth buying at which price points, and how to know when a $40–$80 investment saves you far more than that in shop visits.
The Diagnostic Problem: What a Bent Hanger Actually Looks Like
The reason bent hangers get missed so often is that the misalignment is radial — the hanger points slightly inward or outward at the end where the derailleur mounts — and the human eye isn’t calibrated to catch a 2–3 mm deviation in a small metal tab. Sheldon Brown’s derailleur adjustment reference guide makes the point clearly: cable tension and limit screw adjustments assume the derailleur body is running in a plane parallel to the cassette. Once the hanger introduces lateral offset, you’re no longer tuning the system — you’re fighting it.
The practical consequence: the derailleur cage sweeps through an arc that doesn’t line up with the cassette sprockets. Index shifting (the click-and-land precision of modern drivetrains) depends on very tight tolerances — BikeRadar’s technical overview of derailleur hangers notes that misalignment of even 1–2 mm at the lower jockey wheel can translate to noticeable chain rub and hesitation across the cassette. On a high-end drivetrain like SRAM Red AXS or Shimano Dura-Ace Di2 — where you’re operating within the narrowest chain-line windows of any drivetrain generation ever built — the margin for error is even smaller.
How do you know it’s the hanger and not cable stretch, limit screws, or a worn cassette? The most reliable field test before reaching for any tool: shift to the smallest cog (the easiest gear), look directly down the cassette from behind the bike, and sight the derailleur cage against the sprocket faces. A healthy hanger positions the cage in a clean parallel plane. A bent hanger shows the cage visibly tilted toward or away from the cassette — but again, only on bends larger than about 3–4 mm. Smaller deviations need a gauge.
Why the Cheapest Gauges Are a False Economy
The hanger alignment gauge market runs from roughly $15 for offshore no-name tools up to $80–$100 for purpose-built precision instruments. The price spread reflects a real engineering difference that shows up consistently in owner feedback.
Across aggregated reviews of entry-level gauges, a documented failure mode emerges repeatedly: the threaded tip — the part that screws into the hanger’s derailleur mounting hole — either strips the hanger thread on installation or, more concerning, unthreads itself during the correction process and jams inside the hanger. One reviewer with hands-on experience transitioning from a budget gauge to the CycloSpirit tool described lateral play of approximately an inch in the indicator arm of their previous tool — meaning the gauge itself was introducing as much error as the bend they were trying to measure. That level of slop doesn’t just make the reading unreliable; it makes correction impossible, because you’re pushing against a moving reference point.
The failure mode isn’t hypothetical. Mid-price and premium gauges address it through tighter thread tolerances on the tip, more rigid arm construction, and indicator tips made from materials that maintain contact against the rim sidewall or spoke without chatter. The CycloSpirit gauge specifically receives consistent owner praise for the security of its hanger engagement and the rigidity of the arm across its sweep — two qualities that are exactly what the budget tools lack.
By the numbers:
- Typical shop charge for derailleur adjustment after hanger check: ~$30–$45 per visit (2026 shop rate range, per cycling industry service menus)
- A rider who bent their hanger three times in a season at $30/visit: $90 in shop fees, or the cost of the Park Tool DAG-3 and a few years of self-service
- DAG-3 street price range: $70–$85 depending on retailer
- CycloSpirit gauge range: $40–$55
Park Tool DAG-3 vs. CycloSpirit: The Real Decision Frame
Both tools accomplish the same job through the same mechanism: a threaded tip engages the hanger, an arm extends to the rim, and you rotate the wheel 90° at a time to map any deviation. The methodology is simple enough that YouTube tutorials make the learning curve nearly flat — multiple owner reviews describe the process as “surprisingly simple” after one or two practice runs, and that tracks with the tool’s design intent.
The meaningful differences between the Park Tool DAG-3 and the CycloSpirit gauge live in three areas:
Build quality and tip security. The DAG-3 uses Park Tool’s well-documented precision machining standards. The arm is rigid, the tip engagement is snug, and the reference indicator maintains contact without lateral drift. Owners in long-run reviews consistently report the tool behaving identically on the tenth use as on the first. The CycloSpirit occupies a similar performance tier, with reviewers noting secure tip engagement — a deliberate design contrast to cheaper alternatives — and an arm length sufficient for accurate readings on both 700c road wheels and 27.5/29” MTB hoops.
Price-to-confidence ratio. For a home mechanic servicing one or two personal bikes, the CycloSpirit delivers the core functional requirement — reliable hanger alignment — at a price point that returns to zero after roughly two avoided shop visits. The DAG-3 sits at a higher price, but for riders maintaining multiple high-end bikes, running a small informal shop for a cycling club, or simply wanting Park Tool’s support ecosystem (their documentation is among the most thorough in the industry, per Park Tool’s own support library), the premium is defensible.
Ecosystem fit. Park Tool sells their tooling as a coherent system, and if your workshop already runs on Park Tool stands, bottom bracket tools, and cable cutters, the DAG-3 integrates logically. CycloSpirit is a standalone specialist product with a strong single-tool value proposition but a smaller support footprint.
CyclingNews’ workshop tools overview notes that alignment gauges are among the higher-ROI home mechanic purchases precisely because the problem they solve — hanger misalignment — recurs regularly and invisibly, and because the professional diagnosis step (before any actual correction) costs time and money every single time.
Should You Align or Replace After a Crash?
This is a genuinely contested question, and the right answer depends on the material.
Aluminum hangers (the most common type on mid-to-high-end bikes) are designed to be sacrificial. They bend to protect the frame, but the metal fatigues with each bend-and-straighten cycle. As a general principle endorsed across BikeRadar’s hanger coverage and Sheldon Brown’s workshop notes: if the hanger bent from a significant crash impact, replace it. Straightening is appropriate for minor deviations — the kind that accumulate from trail vibration, repeated minor contacts, or just the physics of aggressive riding — not for acute impact damage where the hanger has taken a serious set.
Steel hangers (found on some steel and titanium frames, often integrated rather than replaceable) are more forgiving of repeated alignment corrections. They bend more gradually and tolerate straightening better than aluminum.
The practical workflow: use the gauge to assess the deviation before deciding. A bend of 1–3 mm measured at the rim, with no visible cracking or stress marks at the hanger tab, is a reasonable alignment candidate. More than 4–5 mm deviation, any visible cracking around the mounting hole, or a hanger that’s been corrected more than two or three times in the same season: replace it. At $10–$25 for most replaceable hangers, the cost-benefit calculation strongly favors a fresh part.
Frequently Asked Questions
How do I know if my derailleur hanger is bent or if my shifting problem is caused by something else?
Systematically eliminate other causes first: check cable tension and housing condition, confirm limit screws are set correctly, inspect the cassette and chain for wear. If shifting is inconsistent across the range rather than consistently off by one gear, and if cable adjustments provide temporary improvement but don’t hold, a bent hanger is high on the suspect list. Sighting the cage against the cassette from behind is a useful quick check; a gauge is the only reliable way to measure small deviations.
Can I align a hanger myself without a gauge using just my eye?
For bends larger than 4–5 mm, a careful visual check can confirm the problem. For the 1–3 mm range — which is precisely the range most likely to cause frustrating, hard-to-diagnose shifting problems — no. The naked eye lacks the precision to detect sub-millimeter variations at that scale with the bike upright.
How bent does a hanger need to be before it affects shifting performance?
BikeRadar’s derailleur hanger overview suggests that 1–2 mm of lateral deviation at the jockey wheel level can produce noticeable shifting hesitation, especially on tightly spaced cassettes (11- and 12-speed systems). The tighter the drivetrain tolerances, the lower the threshold at which misalignment becomes perceptible.
Should I replace the hanger or align it after a crash?
As noted above: assess the severity of the bend and the condition of the material. Minor deviations on an undamaged hanger are reasonable alignment candidates. Significant impact bends or hangers with any visible stress damage should be replaced.
What is the difference between the CycloSpirit gauge and the Park Tool DAG-3 beyond price?
Functionally, both tools do the same job reliably. The DAG-3 carries Park Tool’s manufacturing reputation and integrates into their broader tool ecosystem, which matters to mechanics who value consistency across their toolkit. The CycloSpirit offers competitive build quality — particularly the secure tip engagement that distinguishes mid-range tools from cheap alternatives — at a lower entry price. For a single-bike home mechanic, the CycloSpirit is hard to argue against on value. For multi-bike or shop-adjacent use, the DAG-3’s durability track record across thousands of reported uses tips the scales.
The Decision Rule
If you’ve had one shifting problem you couldn’t resolve with cable adjustments, the gauge pays for itself on diagnosis alone. The math is simple: one avoided shop visit at $30–$45 covers most of the CycloSpirit’s price. The Park Tool DAG-3 makes sense if you’re maintaining three or more bikes, running a club workshop, or if your existing setup is already built around Park Tool’s ecosystem.
What neither tool can give back is the time spent chasing phantom shifting problems through cable tension adjustments, limit screw tweaks, and cassette swaps — all while the real culprit is a two-millimeter bend hiding in plain sight. One owner’s account of using the DAG-3 to finally sort a bike they’d nearly written off — and then going on to fully rebuild it — captures something real: diagnosing the actual problem has a way of turning frustration into momentum. That’s a good return on $40–$85.